

Send Inquiry
Guide to Installing Ham Radio in Your Vehicle
Gathering Equipment
Essential Components
To begin your ham radio installation, gather the essential equipment required for a successful setup:
- Mobile Ham Radio Unit: This is the core of your communication system, allowing you to transmit and receive signals.
- Dual-band or Multi-band Antenna: Choose an antenna that suits your communication needs, providing optimal reception across different frequencies.
- NMO Mount for Antenna: The NMO mount ensures a secure and stable attachment for your antenna to the vehicle's surface.
- Coaxial Cable: This cable connects your radio unit to the antenna, transmitting signals efficiently.
Optional Equipment
In addition to the essentials, consider including optional equipment to enhance your setup:
- Deep-cycle Battery: Opting for a deep-cycle battery provides reliable power for extended usage, particularly useful for off-road adventures.
- Power Distribution Block and Fuses: Ensure safe power distribution by incorporating a distribution block and fuses near your radio unit, protecting against electrical issues.
- Mounting Brackets or Custom Mounts: Secure your radio unit and antenna with mounting brackets or custom mounts, ensuring stability during vehicle movements.
- Cable Organizers or Conduits: Maintain a neat and organized installation by using cable organizers or conduits to manage wiring effectively.
Choosing the Mounting Location
Selecting the right mounting location for your ham radio unit is crucial for accessibility, safety, and performance.
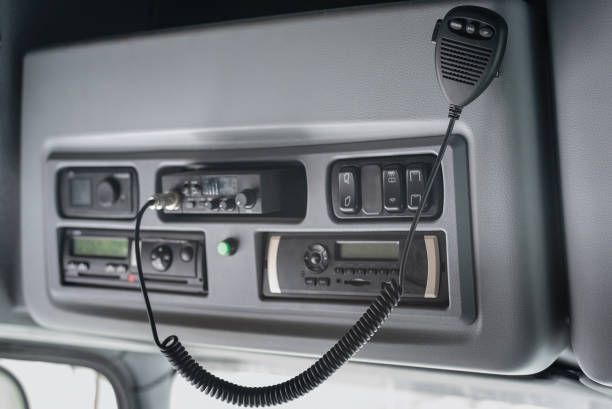
- Accessibility and Reachability: Choose a location within your vehicle that is easily accessible and within reach while driving, ensuring convenient operation without distraction.
- Ventilation Considerations: Ensure the chosen location provides adequate ventilation to prevent overheating of the radio unit, enhancing its longevity and performance.
- Custom Mounts and Brackets for Secure Installation: Utilize custom mounts or brackets to secure the radio unit in place, minimizing vibrations and ensuring stability during vehicle movement.
Installing the Antenna
Finding the Ideal Location
Before installing the antenna, carefully choose the location on your vehicle that ensures optimal performance. Look for areas with minimal obstructions to maximize signal reception and transmission capabilities.
Proper Installation of NMO Mount
Once you've identified the ideal location, proceed with installing the NMO mount according to the manufacturer's instructions. Ensure a secure attachment to the vehicle's surface, providing a stable base for the antenna.
Securing the Antenna in Place
Attach the antenna to the NMO mount, making sure it is securely fastened. Double-check the tightness of the connections to prevent any movement or loosening during vehicle operation.
Connecting Radio to Antenna
Routing Coaxial Cable
Carefully route the coaxial cable from the radio unit to the antenna, avoiding sharp bends and potential damage from moving parts or hot surfaces. Ensure the cable follows a clean and organized path throughout the vehicle.
Cable Management with Organizers or Conduits
To maintain a tidy installation, use cable organizers or conduits to manage the coaxial cable effectively. This not only protects the cable from damage but also prevents interference with other vehicle systems.
Ensuring Secure Connection
Connect the coaxial cable to both the radio unit and the antenna, ensuring a tight and secure connection. Check for any signs of looseness or damage and make adjustments as needed to ensure reliable communication.
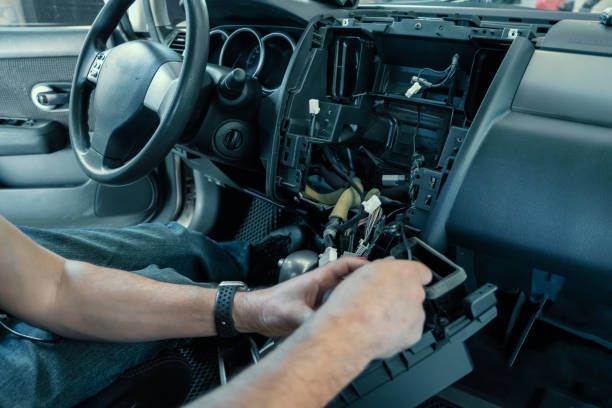
Powering the Radio
Locating Vehicle’s Power Source
Start by identifying the vehicle's power source, typically the battery or fuse box. Choose a location that allows easy access for installation and maintenance.
Installation of Power Distribution Block and Fuses
Install a power distribution block near the radio unit, following manufacturer guidelines for fuse ratings. This block helps distribute power safely and efficiently to the radio and other accessories.
Proper Connection of Power Cables
Connect the power cables from the radio unit to the distribution block, ensuring proper polarity and secure connections. Use appropriate connectors to prevent loosening or electrical issues.
Caution against "Cigarette Lighter" Style Connectors
Avoid using "cigarette lighter" style power connectors, as they may not provide sufficient current for the radio's operation. Opt for direct connections to the vehicle's power source for reliable performance.
Integration with Deep-cycle Battery (if applicable)
If using a deep-cycle battery, integrate it into the vehicle's electrical system according to the manufacturer's instructions. This provides a reliable power source for extended usage, ideal for off-road adventures.
Grounding the Radio
Identifying Suitable Grounding Point
Locate a suitable grounding point on the vehicle's chassis or frame, ensuring it provides good metal-to-metal contact. Choose a point free from corrosion or paint for optimal grounding.
Attaching Grounding Cable Securely
Attach a grounding cable from the radio unit to the chosen grounding point, using a ring terminal or similar connector for a secure connection. Ensure the cable is tightly fastened to prevent any movement.
Ensuring Good Metal-to-Metal Contact
Verify that the grounding connection maintains good metal-to-metal contact, as this is essential for effective grounding. Periodically check the connection for any signs of corrosion or damage and make adjustments as needed.
Testing the System
Verifying Functionality of Controls and Features
Before putting your ham radio system into full use, take time to verify that all controls and features are functioning as expected. Familiarize yourself with the radio's interface and menu system to ensure smooth operation.
Conducting Test Transmission for Proper Operation
Perform a test transmission on a simplex frequency or repeater to confirm proper operation of the radio. This allows you to assess audio quality, signal strength, and clarity, ensuring reliable communication when needed.
Checking Antenna SWR for Optimal Performance
Check the Standing Wave Ratio (SWR) of your antenna to ensure optimal performance. High SWR values indicate poor antenna efficiency, which can affect transmission quality. Adjust the antenna length or position as needed to achieve the best SWR readings.
Finalizing Installation
Double-checking Connections and Mounting Points
Before concluding the installation process, double-check all connections and mounting points for security and stability. Ensure that cables are properly secured and that the radio unit and antenna are firmly in place to prevent any movement or damage during vehicle operation.
Neatly Bundling and Routing Wiring with Organizers
Ensure a clean and organized installation by neatly bundling and routing wiring with the help of organizers or conduits. This not only enhances the aesthetics of your setup but also prevents potential damage to the wiring from sharp edges or moving parts.
Balancing Functionality with Aesthetics
Finally, strike a balance between functionality and aesthetics to achieve a visually pleasing installation. While functionality is paramount, taking the time to tidy up wiring and ensure a clean appearance adds to the overall satisfaction of your ham radio setup.
Conclusion
Never underestimate the significance of reliable communication, especially during off-road explorations and emergencies. With your ham radio system installed, you have a reliable lifeline that can make a significant difference in critical situations, providing peace of mind and enhancing your safety on the road.
As you venture into the world of ham radio communication, consider exploring Ruixue's extensive range of wireless radio equipment. Designed to meet the diverse needs of customers across various environments, Ruixue's products offer exceptional performance, reliability, and versatility. Whether you're a seasoned ham radio enthusiast or a beginner looking to get started, Ruixue has the perfect solution to meet your needs. Visit our website today to discover the latest innovations in wireless radio technology and take your communication capabilities to new heights.